How to turn a Royal Enfield Himalayan into a round-the-world-motorcycle
This post contains affiliate links. That means that if you make a purchase after clicking on a link I will earn a small commission at no extra cost to you.
1 October 2019Riding a motorcycle around the world is not the same as using a motorbike for daily commuting. When you plan to do some good off-road road adventures, you'll need to modify your motorcycle. The good news is that you can practically turn any motorcycle in an around-the-world-bike.
If you've chosen a Royal Enfield Himalayan for your around-the-world trip and/or off-road adventure, then you find my tips to set-up your bike for such an adventure here.
Luggage system
Which luggage system should you choose for your bike? Hard cases or soft luggage? This remains a fierce discussion within the motorcycle community and one of those never-ending-discussions I'm afraid! This is simply because both systems have pro's and con's.
I set up my first Himalayan “Basanti” with hard cases and my second Himalayan “Dhanno” with soft luggage. What I liked about the Royal Enfield panniers is that they are affordable, rugged and you can lock them.
The downside of these panniers (or panniers in general) is that they are heavy and potentially dangerous because your leg can get caught underneath a pannier in case of a fall. Because I didn't open the panniers daily, I got condensation on the inside, resulting in wet spare parts and tools..
The main reason why I chose soft luggage for my second trip is because I wanted to travel lighter. Another advantage of this luggage system is that it expands and contracts to fit exactly the amount of luggage that you want to carry at any moment during your trip.
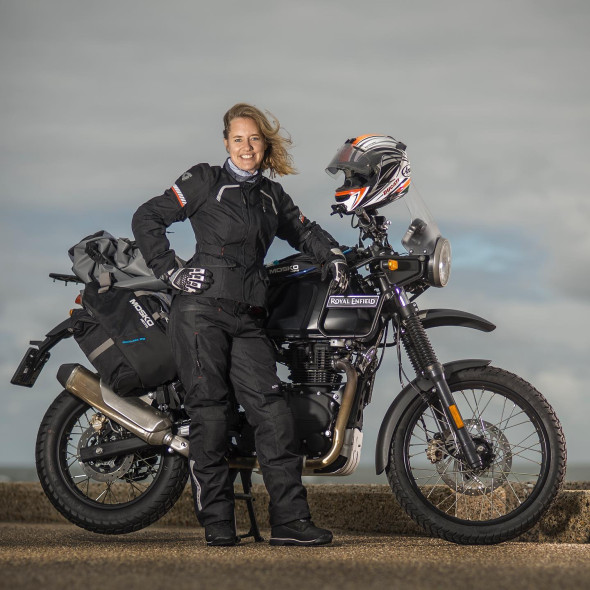
I chose the Mosko Moto Reckless 80, with two additional one-liter bags attached at the front, and one additional 4 liter bag attached at the back. You can order a heat shield to place on to your exhaust to protect the bag, but the Himalayan already has a standard heat shield at that position so I didn't need one. The luggage system is also designed in such a way that the bags will never touch your rear wheel.
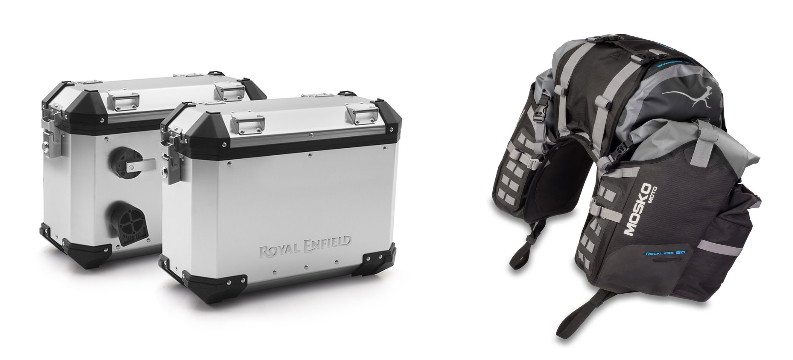
Many people are concerned about the safety of soft luggage when it comes to theft. As an anti-theft protection, I have two safety straps from Steel Core (with stainless steel wire inside) and a lock, which I can use to secure the bags on the side. The 22 liter bag on the top is not secured with a lock, but I take that bag with me into my hotel room each day. When I was riding with the panniers, I also had a 35L softbag on my pillion seat which I took off every day and that wasn't secured either. In that sense, the setup didn't change much and it never gave me any security issues.
Touring Seat
One of the most important parts on long trips is your seat. An uncomfortable seat makes your trip a lot more challenging! I've never been quite happy with the standard seat on the Himalayan so when gearing up for my Patagonia - Alaska trip, I figured I had to choose something more comfortable.
I chose the Royal Enfield touring seat. I haven't tested it for 10 hours straight, but the difference with the standard seat is immediately noticeable, so I am sure it's going to be a much more comfortable ride now!
Handle bar
For my Patagonia to Alaska adventure I decided to change the standard handle bar to the enduro style handle bar. This handlebar has thick walled aluminum bars, with a steel crossbar to add strength. Even though the standard handlebar never got bend on my Asia to Europe trip, I figured a little extra strength on the handlebar wouldn't hurt!
Handguards
On both my Himalayans I installed the Acerbis Rally Pro Handguards. The difficulty with hand guards on the Himalayan is that there isn't much space for them. Depending on the position and type of windshield that you use, the handguards might touch the instrument panel when you turn your handlebar to maximum left or right.
The position of the handguards is also slightly different whether you use the standard handle bar or the enduro style handle bar as described above. Because of the combination of the enduro handle bar and the taller windshield that I got installed for my Patagonia-Alaska trip, I had to shorten the thread on the handguards with a few millimeters so as not to touch the instrument panel.
Navigation system
I am riding with the Garmin Zumo 396 system. When I'm trying to find small backroads, or a specific address, I often use the (free) app Maps.me on my phone.
But I chose to buy this navigation system because I don't want to only rely on my phone to know where I am in the world.
What I love about this Garmin GPS system is that its rugged, waterproof and can take quite a beating (I dropped it so many times already…). It shows important places such as petrol stations and restaurants and its geared towards motorcycles. You can let Garmin choose nice, curvy roads for you if you want!
The downside of Garmin is that buying their maps is expensive and they don't even have coverage in many parts of the world. Because I bought mine in Thailand, it had maps of South East Asia and Europe on it. But when I was riding in Central Asia for example, I had to download Open Street Maps (OSM) for these areas. All the maps I need to ride from Patagonia to Alaska I downloaded from Open Street maps too.
Luckily, OSM is free!
Phone mount
During my travels with Basanti, I tried three different types of phone mounts. I've had a typical 4-legged mount, I've had a mount above the instrument panel (Himalayan Pro Mount) and now I use the Tackform Enduro phone mount from SRC.
I like the Tackform Enduro phone mount because the ‘legs' of the 4-legged versions were always pressing the volume buttons on my Iphone.
Don't forget it depends on the phone that you have which holder works best for you!
Double take mirrors
I chose to install some extra strong double take mirrors on my Himalayan. These mirrors are better adjustable and are wider than the standard mirrors so I can actually see more with these mirrors. I have to admit that the main reason I got these, is that I just really like the design! I find them better compatible with the ruggedness of the Himalayan compared to the ‘cute' round standard mirrors.
Fuel Filters
In some parts of the world the quality of petrol is horrible. I've had some atrocious fuel in Iran, Uzbekistan and Tajikistan. When mechanics opened up my fuel pump to check my fuel filter, it was in such a bad shape that it was a miracle my bike was still running. To protect my fuel filter and fuel pump, I now have two different Guglatech filters.
One filter is placed inside the tank. It has a ring of magnets so it will easily attach itself to the opening of your tank. You can find the fuel filter here.
The second filter is the Fuel Pump Protection Mazinga which is placed right over the fuel pump itself. This is probably the best protection for your fuel filter and pump and it was very easy to place.
In this YouTube video you'll see the instalment of the filters (and the condition of my fuel filter prior to the installation).
Osco chain oiler
During my first long trip, my chain didn't last very long and I was to blame for that. I didn't spend enough time and effort into lubing my chain properly and it resulted in a short lifespan of my chain(s).
Similar to the panniers vs. soft luggage discussion, this is also a topic of endless debate amongst motorcyclists. What you have to take into account when you go around the world is how many kilometers do the refills last, and can you potentially find refills along the way.
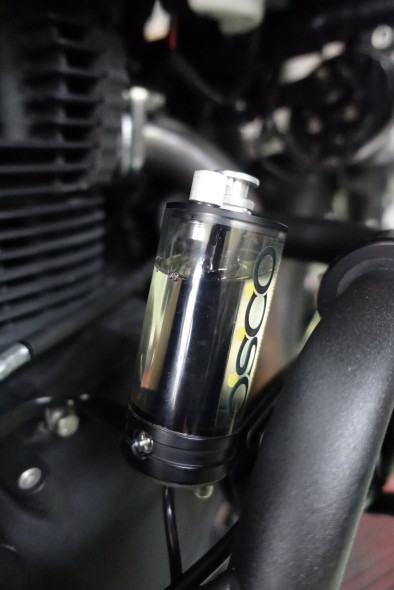
After quite some research, I decided to go for the OSCO system. The main reason being that I do a lot of off-road and having a small film of oil instead of grease protects my chain better in dirt. Secondly, one refill bottle of 100 ml lasts 14,000 kilometers, which is a pretty decent range.
Thirdly, if I run out of my refill bottles, I can find use 75w90 or even engine oil (15w50) to fill it up. These types of oil are widely available so I don't have to worry about finding this. I had the OSCO system mounted onto my engine guard, so I can reach it easily. This system is semi-automatic, so every 300-400 kilometers, you have to pull the plunger, ride very slowly for around 50 meters and your chain is lubed.
Protective accessories
I chose to protect some essential parts on my Himalayan against flying rocks and/or my own stupidity. Because I was so happy with the parts on my bike Basanti, I decided to install them again on my new bike Dhanno, but this time I got the parts in the color black! So I got the same SRC protective parts. With a rear brake master cylinder guard, rear brake fluid reservoir guard, oil cooler guard and a headlight guard.
Dhanno should be well protected during my upcoming Patagonia to Alaska adventure.
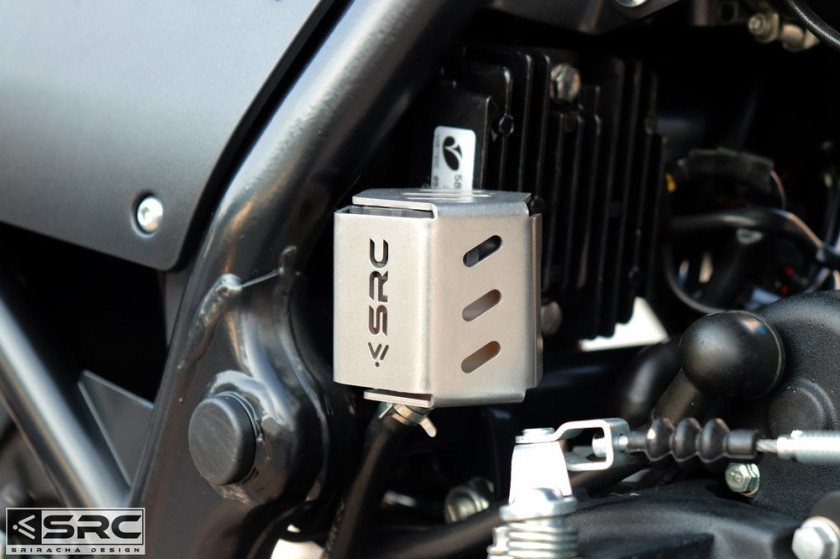
Besides protective parts, SRC also manufactures some other parts that I found of great value. I got the side stand foot enlarger to park my bike in sand or loose gravel. The jerry can mount allows me to attach my additional fuel carriers on the front rack.
Additionally, I got the 12 volt accessory harness to allow me to charge my phone or other devices on the bike. This harness also comes with an integrated SAE battery tender connector, to which I can connect my air compressor. Because I don't have any equipment on my bike that uses the cigarette style charger, I only attached the Dual USB charger on my bike.
Fender risers
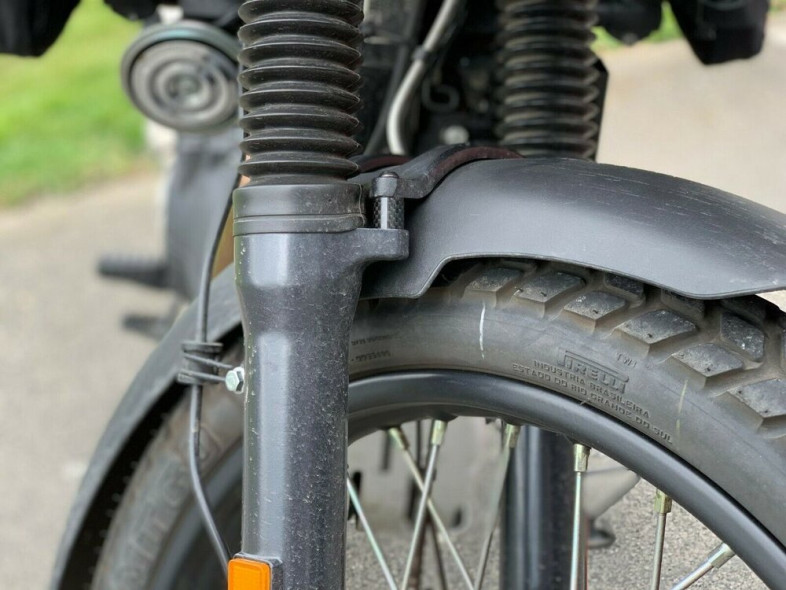
Two very small parts can make a big difference on your bike. The mudguard of the Himalayan (the lower one..) doesn't allow for a lot of mud. If you are trying to plow through some sticky mud, it quickly blocks your tyres entirely.
I got carbon fender risers installed that give you just the bit of extra room that you need - 15 millimeters.
Petrol cans
The fuel tank on the Royal Enfield Himalayan is only 15 liters. Even though the bike runs quite economical, it's wise to bring extra fuel with you. In certain parts of the world, you will not find a fuel station for hundreds of kilometers!
On my first trip, I brought two extra cans of 5 liters each. As it turned out, I've had to use the cans over a dozen times, but I never needed the entire 10 liters. That's why I chose for 3 liters cans for my second trip. They are smaller and lighter on the bike.
These cans are not Rotopax (which are of a reputable quality but due to the elongated size not great to fit on the Himalayan), but they are sturdy and won't damage easily. Trust me, I tried to damage them! These cans are only sold in the color red, so I painted mine black!
Windshield
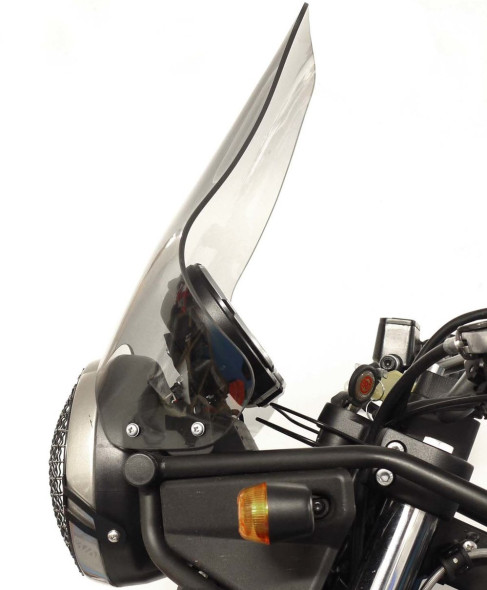
I have never been happy with the standard windshield on the Himalayan. With my height, it creates a turbulent air stream right in my face. For my Patagonia to Alaska ride, I chose to buy a different windshield. The only one that I could find online was one from Hitchcocksmotorcycles.com.
This windshield is 6 centimeters taller and slightly tinted. I cannot say that the turbulent wind stream is entirely gone, but riding comfort definitely improved. Furthermore, the windshield is slightly thicker (and, in my opinion, of better quality than the stock windshield) and doesn't vibrate at all.
Additional lights
The headlight of the Himalayan is not very bright so to increase my visibility and have better vision in tunnels and such, I had extra lights installed. I chose for the PIAA LP 270 lights. They aren't cheap but the quality is high and they create two great beams on the side of the motorcycle.
They come with a switch which you can stick on your handle bar or next to your instrument panel. The lights themselves can be mounted onto your engine guard.
Engine guard
Together with the hand guards protecting your levers, an engine guard is in my opinion essential for a round-the-world trip. My first engine guard I bought locally on the market in New Delhi, India. It was cheap and functional and I have no complaints about it!
The engine guard that I installed for my Patagonia-Alaska trip is from Givi. I first saw this engine guard on a fellow YouTube channel named Karmakaze Moto. He uploaded an installation video too and the guard looked very well designed. The fact that both sides of the guards are connected to each other increases the strength of the engine guard substantially.
Hydration pack
Fiddling around with water bottles and making regular stops just to drink water gets very annoying if you are riding in a hot climates! I love having a camelback with me, so I can just put the tube underneath my helmet and drink while riding.
For a long time I used the 2 Liter Kriega hydration system. I have no complaints about the quality of this gear, but carrying 2 liters of water on your back the entire day started to cause me back pain.
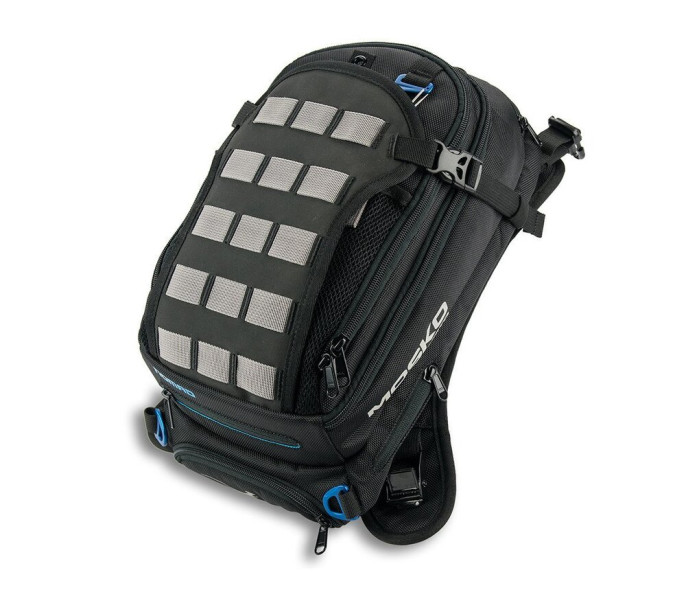
That's why I now ride with the Mosko Moto Nomad Tankbag which has a camelback integrated in the tank bag. That way I can still drink water while riding, but I don't have to carry the weight on my back anymore!
Music installation
I have the simple Sena 3S headset incorporated in my helmet. After setting it up once, it automatically connects to my phone via bluetooth. I listen to Spotify music during all my rides!
This is one of the cheapest and most basic versions of the Sena systems. The device that's placed on the side of my helmet is only for raising or lowering volume, but that's all I need. I don't need to talk to other riders as I always ride solo. The sound quality of this basic version is excellent. The only disadvantage is the short battery life. I have to charge it after each day of riding.
Bike cover
One item that I carried with me on both trips is a bike cover. It protects my bike from rain, dust and most importantly, curious people. I don't want people, other than myself, to sit on my bike and pushing buttons when I'm not there!
A bike cover prevents that and attracts less attention to the motorcycle. The first bike cover, I bought on the local market in Delhi, India. It sort-of survived the first trip, but it got ripped by a dog at one stage. So for my Patagonia to Alaska trip I got a new cover.
That's it. My most valued accessories to turn a Royal Enfield Himalayan in a round-the-world-motorcycle!
What I didn't install
Besides this list of accessories that I think will give you a good start of your motorcycle adventure, there is also a (short) list of items that I decided not to install:
After market exhaust
On my first Himalayan I installed an after market exhaust which I bought in Delhi: a Gursewak exhaust. I did that because I love a big sound on a motorcycle. Nothing has changed in that regard, I still love a big sound on a motorcycle! The problem is that I also love to ride in nature and in (protected) national parks. Riding around a beautiful area full of wildlife on an extremely loud motorcycle just didn't feel right. Therefore I decided to stick with the stock exhaust for my second trip.
Powertronic ECU
Another item that I installed the first time, but didn't do the second time is the Powertronic Piggyback ECU. I installed it because I was curious to see whether it would give me some extra power. The main effect of the ECU was that the engine ran significantly cooler and that it had more pick-up. But other than that, it didn't give me a lot more overall power. When I bought a drone, it turned out that the drone signal interfered with the piggyback ECU and it resulted in an engine light error. This gave me such a scare that I decided to remove it and not install it again!
Especially on a round-the-world trip, messing with the wiring and installing another ECU is risky. I took that risk the first time because my excitement took over from reason. So this time around, I stick to my main principles: keep the motorcycle as simple as possible when it comes to electronics when you take it around the world!
Heated grips
Heated grips is another topic of discussion. Many motorcyclists swear by heated grips. During my first trip, I rode around some extremely cold environments with summer gloves and had a fairly painful experience there. Many people have suggested me to install heated grips after this little mishap.
I decided to bring good, warm gloves for cold environments this time, and (still) not install heated grips. The reason for this is that the Himalayan is quite a compact motorcycle. I already have wiring for my navigation system, usb charger and extra lights and there simply isn't much room left for another bunch of wiring.
Secondly, I want to be careful not to attach too many electrical gadgets to my battery and drain it at an inconvenient time! Like I said above, I try to keep the bike as simple as possible when it comes to electronics / wiring. I am quite confident that my special winter gloves will keep my hands warm this time, so let's find out…
Let's go on an adventure now!
Thank you for your description. I am currently preparing myself and my Himalayan for a longer trip. It's interesting to see how other travellers are doing.


